 By Claire Whitaker
Updated November 2026
Kitchen sink waste fittings are the parts that connect your sink bowl to the drain line, and getting them right is the difference between a tight, quiet sink and one that drips under the cabinet. In this guide you will learn what each fitting does, how to identify the parts you have, how to choose replacements, and how to install or swap them so they stay leak-free for years. Most of the work needs only basic hand tools and about an hour of patience.
What Kitchen Sink Waste Fittings Actually Do
The waste assembly is a chain of components that moves water and debris from the sink bowl into the trap and then into the drainpipe. The visible part is the strainer or drain flange. Below it sits a gasket, a locknut or slip nut, and often a tailpiece, which is the short vertical pipe that carries water down to the trap. The trap is the U-shaped bend that holds a small amount of water to block sewer gas. Each joint in this chain is a potential leak point, so every fitting has to seal against the one next to it.
Shopping for one? See our guide: 6 Best Sink Strainers for Kitchen Sink (2026): Expert Picks.
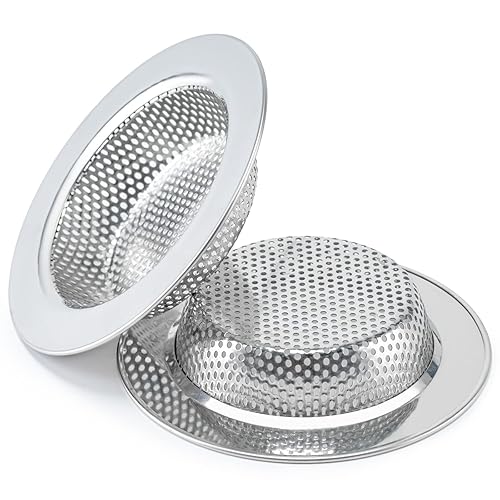
Waste fittings come in a few broad types. A basket strainer uses a threaded or clamped flange and a removable basket to catch food. A pop-up drain has a stopper mechanism that opens and closes the drain. A grid drain sits in the bottom of the bowl and mainly protects the surface. Your sink type, whether single or double bowl and whether it is top-mount or undermount, usually determines which fitting you need.
Identifying the Fittings You Already Have
Before buying anything, take stock of the existing assembly. Remove the strainer and look at the flange from underneath. Note the outside diameter of the drain opening, which is usually 3-1/2 inches in the United States, and check whether the flange is threaded or uses a locknut that tightens from below. Measure the tailpiece diameter, which is commonly 1-1/2 inches, and note whether the trap uses slip joints or threaded connections.
A few quick checks help you avoid buying the wrong part:
- Measure the drain hole diameter at the sink bottom, typically 3-1/2 inches for standard US sinks.
- Check the tailpiece outside diameter with a tape measure or caliper, most often 1-1/2 inches.
- Count the number of bowls. Double-bowl sinks need two complete waste assemblies, and sometimes a single tailpiece tee.
- Look for a brand or model stamp on the old strainer, which can help you match parts.
- Decide whether you want a pop-up stopper or a basket strainer, since that choice affects the rest of the kit.
If you are replacing the whole sink, check our guide on Parts of Kitchen Sink: 7 Best Drain Kits and Strainers Compared to see how complete drain kits are packaged.
Choosing Replacement Waste Fittings
Material and finish matter more than most shoppers expect. Brass and stainless steel are the most common choices for the strainer body and flange. Brass is durable and holds threads well, while stainless steel resists corrosion, especially in dishwasher-heavy kitchens. Plastic tailpieces and traps are common on budget assemblies and work well when they are installed correctly, but they can crack under overtightening.
The table below summarizes the most common fitting types and what they suit best.
| Fitting type | Best for | Main consideration |
|---|---|---|
| Basket strainer | Catching food scraps | Needs regular emptying and cleaning |
| Pop-up drain | Filling the sink for washing | The stopper mechanism can wear or leak |
| Grid drain | Protecting bowl surfaces | Less effective at catching small debris |
| Threaded flange | Secure seal with a locknut | Requires careful thread alignment |
| Clamped flange | Easier installation | Confirm the clamp fits your sink thickness |
When comparing products, look for flanges with a rubber gasket and a fully threaded or clamped design. Manufacturers typically specify the sink hole diameter and maximum sink thickness on the packaging, so check those numbers against your measurements. Owners often report fewer leaks when the kit includes new gaskets and a matching slip nut rather than reusing old ones.
Step-by-Step Installation of Kitchen Sink Waste Fittings
Installing a new waste fitting takes a clear sequence. Work in this order and you will avoid most of the common problems.
Tools and Supplies You Will Need
- Bucket or large container to catch water
- Adjustable wrench and slip-joint pliers
- Plumber’s putty or a silicone-based sealant, depending on the flange type
- Flathead screwdriver or drain removal tool
- Replacement gaskets, washers and slip nuts that match the new kit
- Old towel or rag for drying surfaces
Removing the Old Assembly
Place the bucket under the trap, then loosen the slip nuts on the trap arm and tailpiece by hand or with pliers. Remove the trap and drain the remaining water. Next, release the locknut under the sink bowl by turning it counterclockwise while bracing the flange from above. If the flange is stuck, a flathead screwdriver placed across the strainer cross-bars can help you hold it steady. Clean any old putty or gasket residue off the sink surface with a plastic scraper.
Setting the New Flange
- Apply a thin, even bead of plumber’s putty around the underside of the new flange, or install the rubber gasket as the manufacturer directs.
- Press the flange into the drain hole from above, making sure the alignment tabs or threads sit correctly.
- From below, install the gasket, washer and locknut in the order shown in the instructions.
- Tighten the locknut evenly. Snug it firmly but avoid overtightening, which can crack the flange or distort the gasket. A quarter turn past finger-tight is a common target for putty seals, though exact torque varies by product.
- Wipe away excess putty that squeezes out around the rim.
Connecting the Tailpiece and Trap
- Attach the tailpiece to the bottom of the flange using its slip nut and washer. Hand-tighten first, then add a small additional turn with pliers.
- Reconnect the trap arm and the trap bend, checking that each slip nut has its washer seated inside the joint.
- Test the assembly by running water. Watch for drips at each connection, and tighten by small increments only if needed.
If you have a double-bowl sink, repeat the process for the second bowl and connect both tailpieces to a tee before running into the trap. Gaps or misalignment at the tee are a frequent source of slow drips, so check that each arm sits square before tightening. Drain problems that appear after installation are often covered in our Kitchen Sink Plumbing Drain Guide: Fix Slow Drains in 6 Steps.
Testing and Troubleshooting Leaks
After installation, fill the sink to about two inches and let the water sit for a minute. Then open the drain and look under the cabinet. A small drip at the locknut usually means it needs a slight additional turn or a fresh gasket. A drip at a slip joint on the trap often points to a worn washer or a cracked nut. If water seeps at the flange top rim, the putty seal may need to be reapplied. Let the assembly dry, then retest. Patience here prevents water damage later.
Common Mistakes to Avoid
- Overtightening plastic slip nuts, which can crack threads or distort washers.
- Reusing old gaskets and washers, which often flatten and stop sealing.
- Mismatching flange diameter and sink hole size, which causes gaps or rocking.
- Skipping the water test, so a slow leak goes unnoticed inside the cabinet.
- Forgetting to check the trap alignment, which can stress joints and cause drips.
- Using too much putty, which can squeeze into the drain and block flow.
Tips for Long-Lasting Waste Fittings
Clean the strainer basket every few days to prevent food buildup, which can bind the stopper and strain the seals. Run hot water for about 30 seconds after using the garbage disposal or washing greasy pans, since this helps clear residue from the trap. Check the slip nuts once or twice a year by hand, and tighten only if they feel loose. If you are cleaning the sink surface around the drain, a gentle, non-abrasive cleaner works better than harsh scrubbers. Our article on How to Clean a Kitchen Sink: 5 Steps for Stainless and Porcelain covers safe methods.
Recommended gear
A few inexpensive supplies make waste fitting work far easier. Choose items that match the type of connection in your sink.
- Plumber’s putty helps create a watertight seal under the flange on traditional drains. It is easy to remove later, which makes it useful for future repairs. View on Amazon
- Slip-joint pliers give you a firm grip on plastic and brass nuts without slipping. They are useful for tightening trap connections. View on Amazon
- Silicone plumbing gasket kit offers replacement washers and gaskets sized for common drain assemblies, which is handy when the old ones are hard or cracked. View on Amazon
- Drain flange removal tool helps you loosen a stuck locknut from above without damaging the sink surface. View on Amazon
FAQ
What size are most kitchen sink waste fittings?
Most US kitchen sinks use a 3-1/2 inch drain opening and a 1-1/2 inch tailpiece. Always measure your own sink, since some European and older sinks differ.
Do I need plumber’s putty or silicone for the flange?
It depends on the design. Traditional flanges usually use plumber’s putty, while many newer clamped or gasketed flanges use a rubber gasket instead. Follow the instructions included with your kit.
How tight should the locknut be?
Tighten it firmly by hand plus a small additional turn with pliers or a drain wrench. Overtightening can crack the flange or deform the gasket, so tighten in small steps and check for leaks after each adjustment.
Why does my new drain leak under the sink?
The most common causes are a misseated gasket, a loose slip nut, or a misaligned trap arm. Dry the joints, check each washer, and retest with water.
Can I replace only the strainer without changing the tailpiece?
Often yes, as long as the new flange matches the sink hole and the tailpiece diameter. Confirm the measurements before buying to avoid a mismatch.
How often should I replace waste fittings?
There is no fixed schedule. Replace them when you see persistent leaks, cracks, corrosion or a stopper that no longer seals. Gaskets and washers are the most common parts to wear out.
Is it safe to do this myself?
Basic waste fitting replacement is within reach for most homeowners with simple tools. If you find corroded pipes, a damaged drainpipe, or water behind the cabinet that you cannot stop, consult a licensed plumber.
Conclusion
Kitchen sink waste fittings are simple in design but demand careful measurement and sealing. Identify your drain size and tailpiece diameter, choose matching components, and tighten each joint evenly. Test with water before closing the cabinet, and you will have a drain that works quietly for years.
Related reading
- Kitchen Sink Faucet Black: Finishes, Care and Buying Tips
- Top 7 Stainless Steel Kitchen Sink Maintenance Products Compared
- Replacement of Kitchen Sink: 7 Best Picks Compared (2026)
Ready to choose one?
About Claire Whitaker
Claire Whitaker is part of our editorial team and reviews and edits our kitchen faucets & sinks guides, checking product details against manufacturer specifications and owner feedback.