 By Caleb Morgan
Updated November 2026
Moen bath faucet parts are easy to identify once you know where to look, and most repairs come down to replacing one of four things: the cartridge, the valve seat, the O-rings, or the handle and trim. This guide shows you how to confirm which part has failed, how to find the exact replacement, and how to install it so the faucet stops dripping, sputtering, or feeling stiff. Along the way, you will find links to related repair resources on this site.
Before You Start: Gather Tools and Confirm the Problem
Most Moen bath faucets can be serviced with basic hand tools, but having the right ones on hand prevents stripped screws and scratched finishes. Before you order anything, shut off the water supply to the tub and shower. If your faucet has no dedicated shutoffs, close the main valve to the house, then open the faucet to drain remaining water.
Shopping for one? See our guide: 5 Best Kitchen Moen Faucet Repair Parts Compared (2026).
Tools and supplies checklist
- Phillips and flathead screwdrivers
- Allen (hex) key set, usually 3/32 inch and 5/32 inch
- Adjustable wrench or basin wrench, wrapped in tape to protect the finish
- Cartridge puller tool (Moen usually sells one; a pair of pliers with a rag works in a pinch)
- Plumber’s silicone grease, safe for brass and rubber
- Soft cloth and painter’s tape to protect the trim
- A bucket or towel to catch water
- Replacement parts matched to your model
Confirm which symptom points to which part
Different symptoms usually trace back to different components. Owners often report that a drip from the spout points to the cartridge, while a leak around the base of the handle usually points to O-rings or a packing seal. Use the table below as a starting point.
| Symptom | Most likely part | Quick check |
|---|---|---|
| Constant drip from spout | Cartridge or valve seat | Close both shutoffs, remove handle, inspect cartridge |
| Water leaking at handle base | O-rings or cartridge seal | Look for moisture around the handle collar |
| Stiff or hard-to-turn handle | Cartridge with mineral buildup | Move handle slowly; check for grit |
| Hot and cold temperatures reversed or mixed | Cartridge alignment or damaged cartridge | Note which way handle turns; check cartridge orientation |
| Low or uneven flow | Aerator or clogged cartridge | Unscrew spout and check screen first |
How to Identify Your Moen Bath Faucet Parts
Moen has produced many bath faucet series over the decades, and internal components differ between them. Matching the part to your exact model matters more than matching the look of the handle. Manufacturers specify that cartridges, in particular, are model-specific.
Find the model number and series
Look for the model number stamped on the back plate, under the escutcheon, or on the spout base. Write down the series name as well, since names like Moen Posi-Temp or Moen Monticello appear on the packaging and in the installation manual. If the number is worn off, remove the handle and read the markings on the cartridge itself.
Use a parts diagram
Once you have the model, pull up the exploded parts diagram from Moen’s support site or the installation sheet packed with the faucet. Diagrams label each component with a reference number, which you can match to the parts list. For a deeper walkthrough of reading these drawings, see Moen Kitchen Faucet Parts Diagram: How to Find and Use Yours, which applies the same logic to kitchen models.
Compare the old part before buying
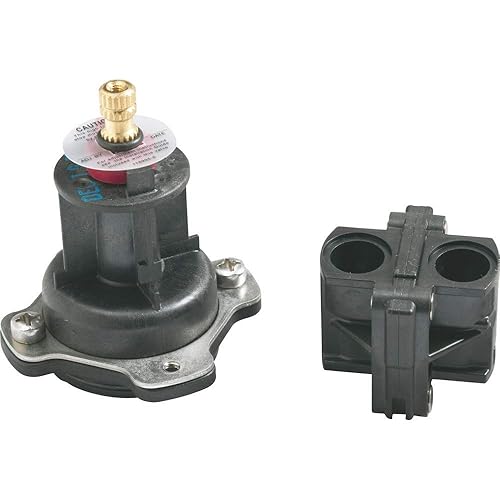
Remove the cartridge and lay it beside the new one. Check the stem height, the number of notches or slots on the bottom, and the color of the index mark. Even two cartridges that look alike can differ in length by a few millimeters, which will prevent proper seating.
Step-by-Step: Replacing a Moen Bath Faucet Cartridge
The cartridge is the most common failure point, so most repairs follow this sequence.
Step 1: Shut off water and remove the handle
Turn off both supply valves. Pry off the decorative cap on the handle, usually with a flathead screwdriver wrapped in tape. Remove the handle screw with the correct Allen or Phillips driver and lift the handle straight off.
Step 2: Remove the escutcheon and retaining clip
Slide off the trim (escutcheon) cover. Inside you will see a retaining clip or locking nut. Remove it carefully and keep it, since losing this clip is one of the most common reasons owners cannot finish the job.
Step 3: Pull the cartridge
Use the cartridge puller or pliers to lift the cartridge straight up. Work it gently to break any mineral seal. Avoid twisting, which can damage the cartridge housing in the wall.
Step 4: Clean the valve body
Inspect the valve body and seat for scale, sand, or debris. Wipe it clean with a soft cloth. Owners often report that a simple cleaning fixes sputtering, but if the seat is pitted or cracked, replace it too.
Step 5: Install the new cartridge
Lightly coat the new cartridge’s O-rings with plumber’s silicone grease. Align the cartridge’s index tab with the notch in the valve body, then press it straight down until fully seated. Reinstall the retaining clip or nut.
Step 6: Reassemble and test
Reattach the escutcheon, handle, and cap. Open the shutoff valves slowly. Run the faucet on hot and cold separately, then mixed, checking for leaks at the handle and the spout. Check that the hot side is on the left when the handle is in the closed position, which is the standard orientation for most Moen bath faucets.
Replacing Seals, O-Rings and Trim
If the cartridge is fine but the handle leaks, the problem is usually a worn O-ring or packing nut. These parts are inexpensive and often included in repair kits. Replace them while the faucet is disassembled rather than waiting for a second leak. Use the same plumber’s grease, and avoid petroleum-based lubricants, which can swell rubber.
Handle and trim replacement
Cracked handles, faded finishes, and loose stems usually mean the trim needs replacing rather than the internals. Match the handle to the cartridge stem type. Handles designed for one cartridge family may not fit another, even when they look identical.
Common Mistakes to Avoid
- Skipping the shutoff check. Confirm water is off by opening the faucet and seeing no flow before removing anything.
- Buying by appearance only. Two handles can look the same while using incompatible cartridges.
- Forgetting the retaining clip. Note its position before removing it.
- Over-tightening. Snug is enough for handle screws and nuts. Excess force cracks plastic and strips threads.
- Installing the cartridge backward. Always confirm the index tab aligns before pressing down.
- Using non-approved lubricants. Stick to silicone-based grease.
Tips for Long-Lasting Results
- If your water is hard, flush the aerator and cartridge seat every year to slow mineral buildup.
- Keep a note of the model number and the date of each repair inside a kitchen drawer or on your phone.
- Replace the cartridge and seat together when both show wear, rather than repeating the job in a few months.
- Check the supply lines and shutoffs at the same time, since a stuck shutoff can make a repair harder than it needs to be.
Recommended gear
A few items make this repair noticeably easier, especially the cartridge removal step.
- Moen Cartridge Puller: Designed for lifting cartridges without damaging the valve body, which is the step where many DIY attempts go wrong. View on Amazon
- Plumber’s silicone grease: A small tube protects O-rings and makes cartridges slide in smoothly. View on Amazon
- Allen key set with metric and SAE sizes: Covers the handle screws found on many Moen trims. View on Amazon
- Basin wrench: Useful if you need to reach supply nuts or the base of the valve in a tight vanity or tub surround. View on Amazon
FAQ
Can I use a universal cartridge in my Moen bath faucet?
Universal cartridges exist, but they rarely fit Moen bath valves perfectly. Manufacturers specify model-matched cartridges for the best seal and temperature control, so buy the one listed for your exact series.
How do I know if the valve seat needs replacing?
If the faucet still drips after you install a new cartridge, the seat is the likely cause. Look for pitting, grooves, or a rough surface. Seat replacement requires a seat wrench and is best done with the valve body accessible.
Why does my Moen bath faucet make a whining sound?
Whining or chattering usually means worn washers or a partially clogged cartridge, or water pressure that is higher than the valve likes. Clean the cartridge and check the pressure at the house.
Do I need to replace the handle when I replace the cartridge?
Not always. Remove the handle only as needed to reach the cartridge. If the handle is cracked, stiff, or no longer matches the stem, replace it as well.
Why is my water temperature reversed after a repair?
The cartridge was probably installed rotated or the hot and cold lines were swapped. Remove the cartridge, check the index tab alignment, and confirm the hot supply is connected to the correct side.
How often should I service the cartridge?
There is no fixed schedule. Owners often report needing a cartridge replacement every few years in areas with hard water, and much less often where water is soft. Service sooner if you notice drips or stiffness.
Is a bathtub faucet repair similar to a kitchen faucet repair?
The principles are the same, but bath valves are usually reached through a wall or tub surround, which makes access harder. For bath-specific guidance, see Delta Bathtub Faucet Parts: Identify, Source, and Replace the Right Ones and Repair Delta Tub Faucet: 7 Best Kits and Parts Compared (2026).
Conclusion
Most moen bath faucet parts problems come down to a worn cartridge, a damaged seat, or tired O-rings, and each can be identified with a few careful checks. Matching the part to your exact model, shutting off water properly, and using silicone grease will prevent most repeat repairs. Save the model number and parts diagram so future fixes take minutes instead of hours. If you are unsure about a complex valve issue or a plumbing connection inside the wall, consult a licensed plumber.
Related reading
- Moen Sink Faucet Repair: 5 Best Kits and Parts Compared (2026)
- Moen Kitchen Faucet Replacement Parts: Find and Install the Right One
Ready to choose one?
About Caleb Morgan
Caleb Morgan is part of our editorial team and reviews and edits our kitchen faucets & sinks guides, checking product details against manufacturer specifications and owner feedback.